CamSplitter 2 — Gigapixel Rendering for Blender
Some renders simply don't fit into memory, no matter how strong the workstation: building facades, exhibition posters, ultra-high- resolution stills. CamSplitter 2 splits the camera view into tiles, renders them one by one, and stitches the result back together automatically — turning renders that would normally crash Blender into ones that finish reliably on standard hardware.
How tile rendering works
Instead of computing one huge image at once, CamSplitter divides the camera view into a grid of smaller tiles — a 4×4 grid, for example, is 16 individual tiles. Each tile is rendered on its own and then composited back into a single final image. The effect: renders at 20,000 × 20,000 pixels and beyond become possible without exhausting VRAM or system memory, even with heavy adaptive subdivision and displacement.
Because every tile is processed independently, CamSplitter can pick up exactly where it left off. Render N Missing keeps every verified tile and renders only what is still open, unclear or failed, recovering hours of render time after a crash, a reboot, or a cancelled session.
Hi-Res Showcase: 15,360 × 8,640 px, rendered with CamSplitter
This still was rendered at 15,360 × 8,640 pixels — a resolution beyond what a single GPU renders in one pass, reached by splitting the camera view into tiles and rendering them one by one. Because every tile is independent, changing only part of the image — the garden, say — means only the affected tiles need to be rendered again, not the whole frame.
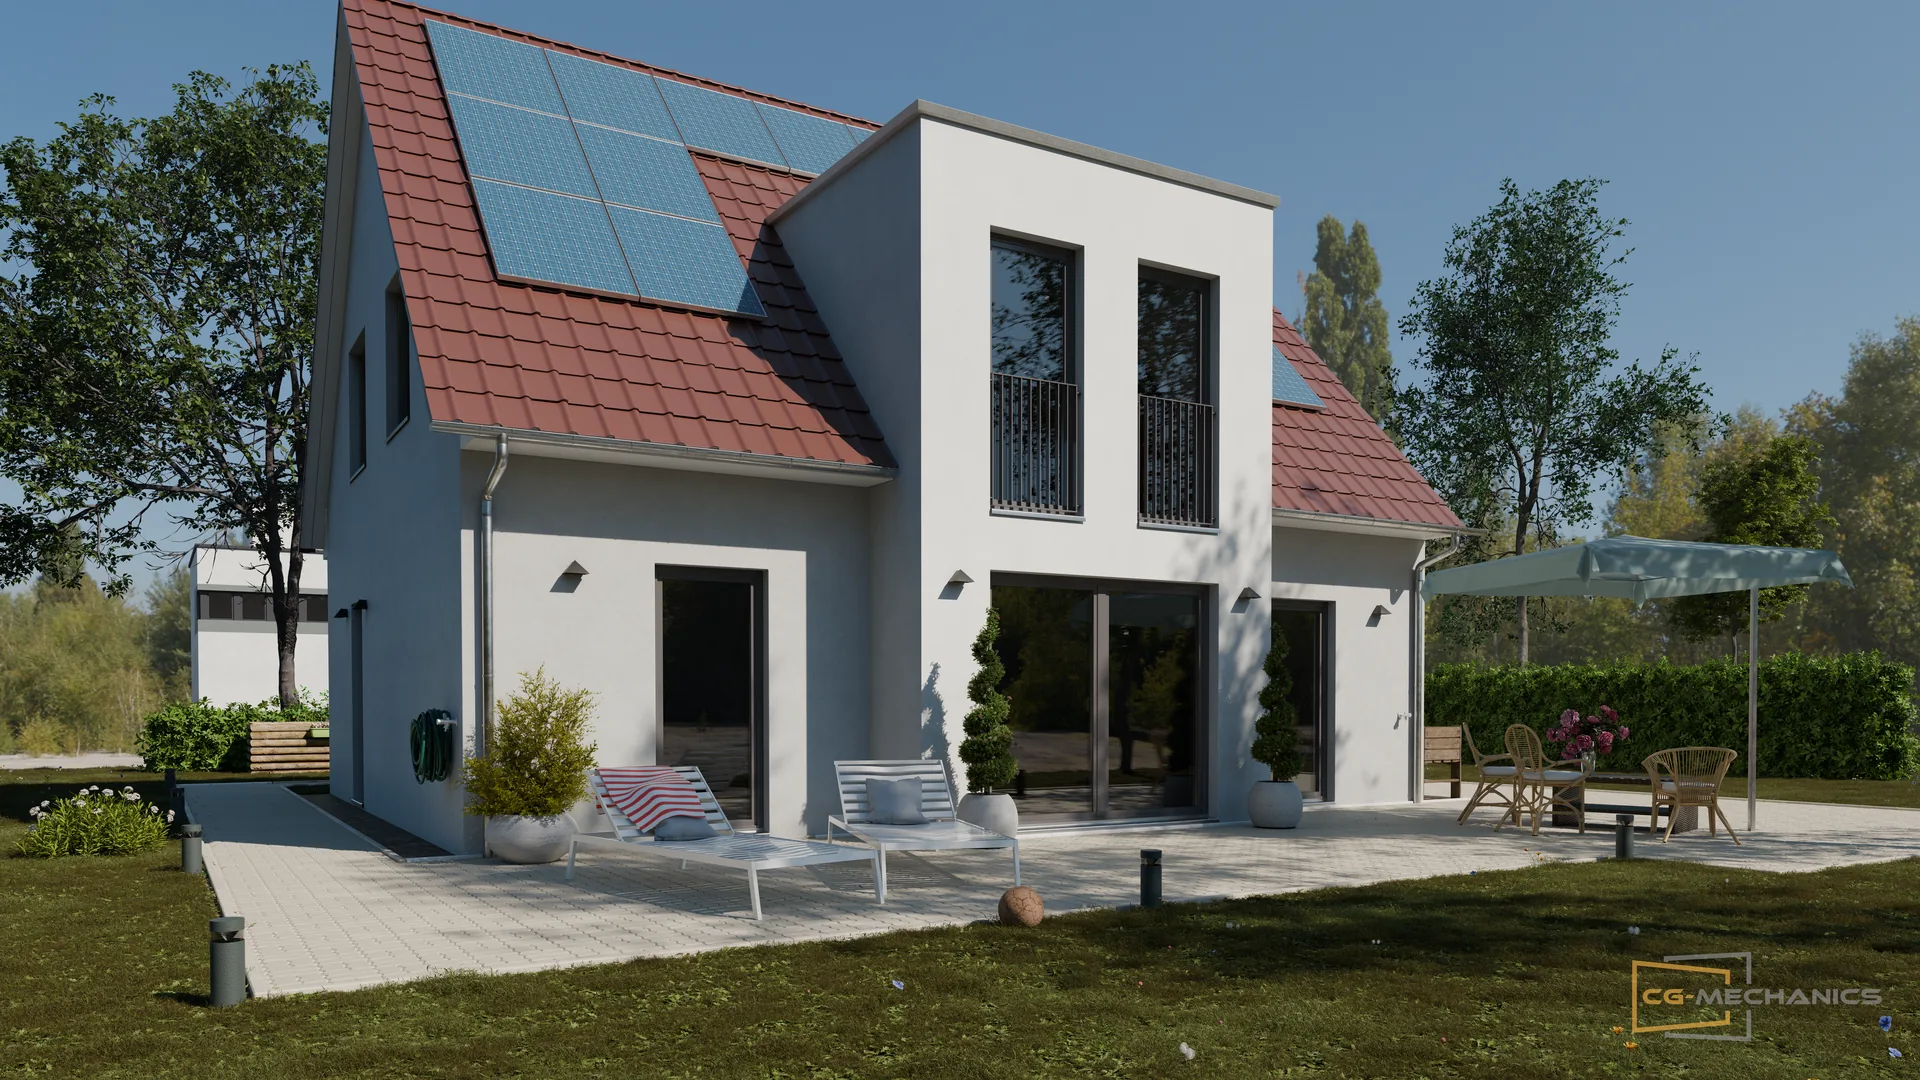
Scroll to zoom, drag to pan — on mobile: pinch to zoom, one finger to pan.
See the render load before you render it
A high-resolution render rarely fails because of the whole image — usually it's a handful of small areas that are unusually expensive: too many subdivided objects, heavy displacement, an oversized texture. CamSplitter's analysis tools make those hotspots visible before you commit to a multi-hour render.
Grid & high-resolution heatmaps
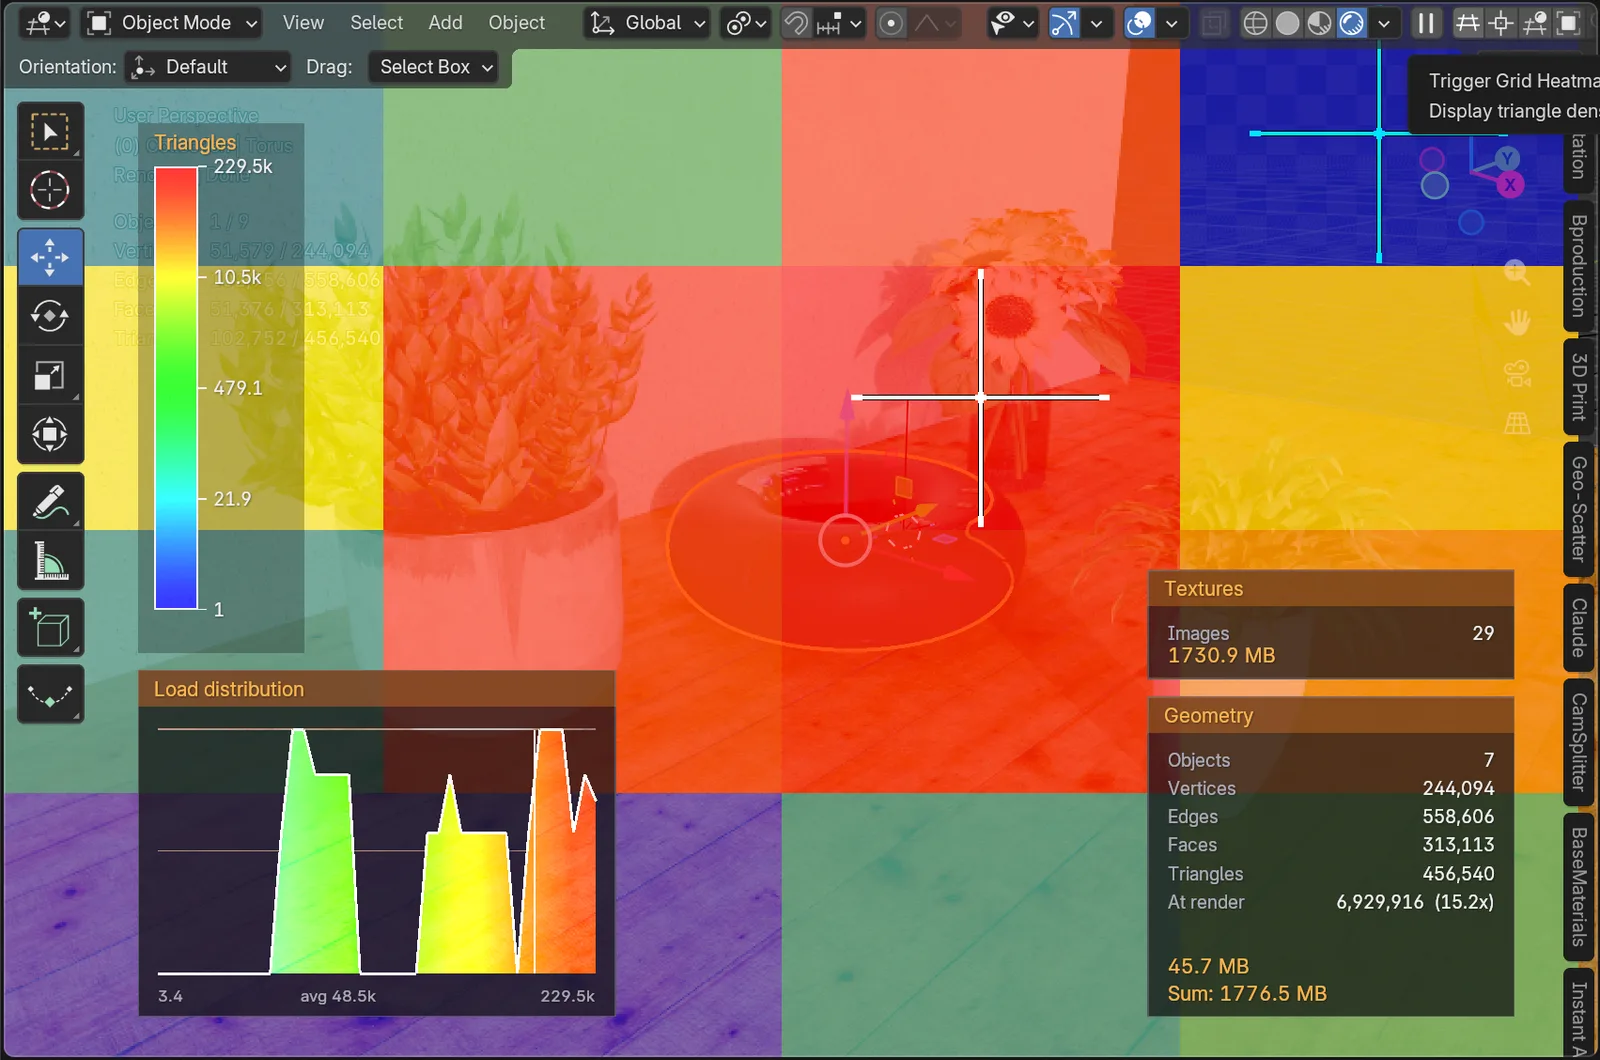
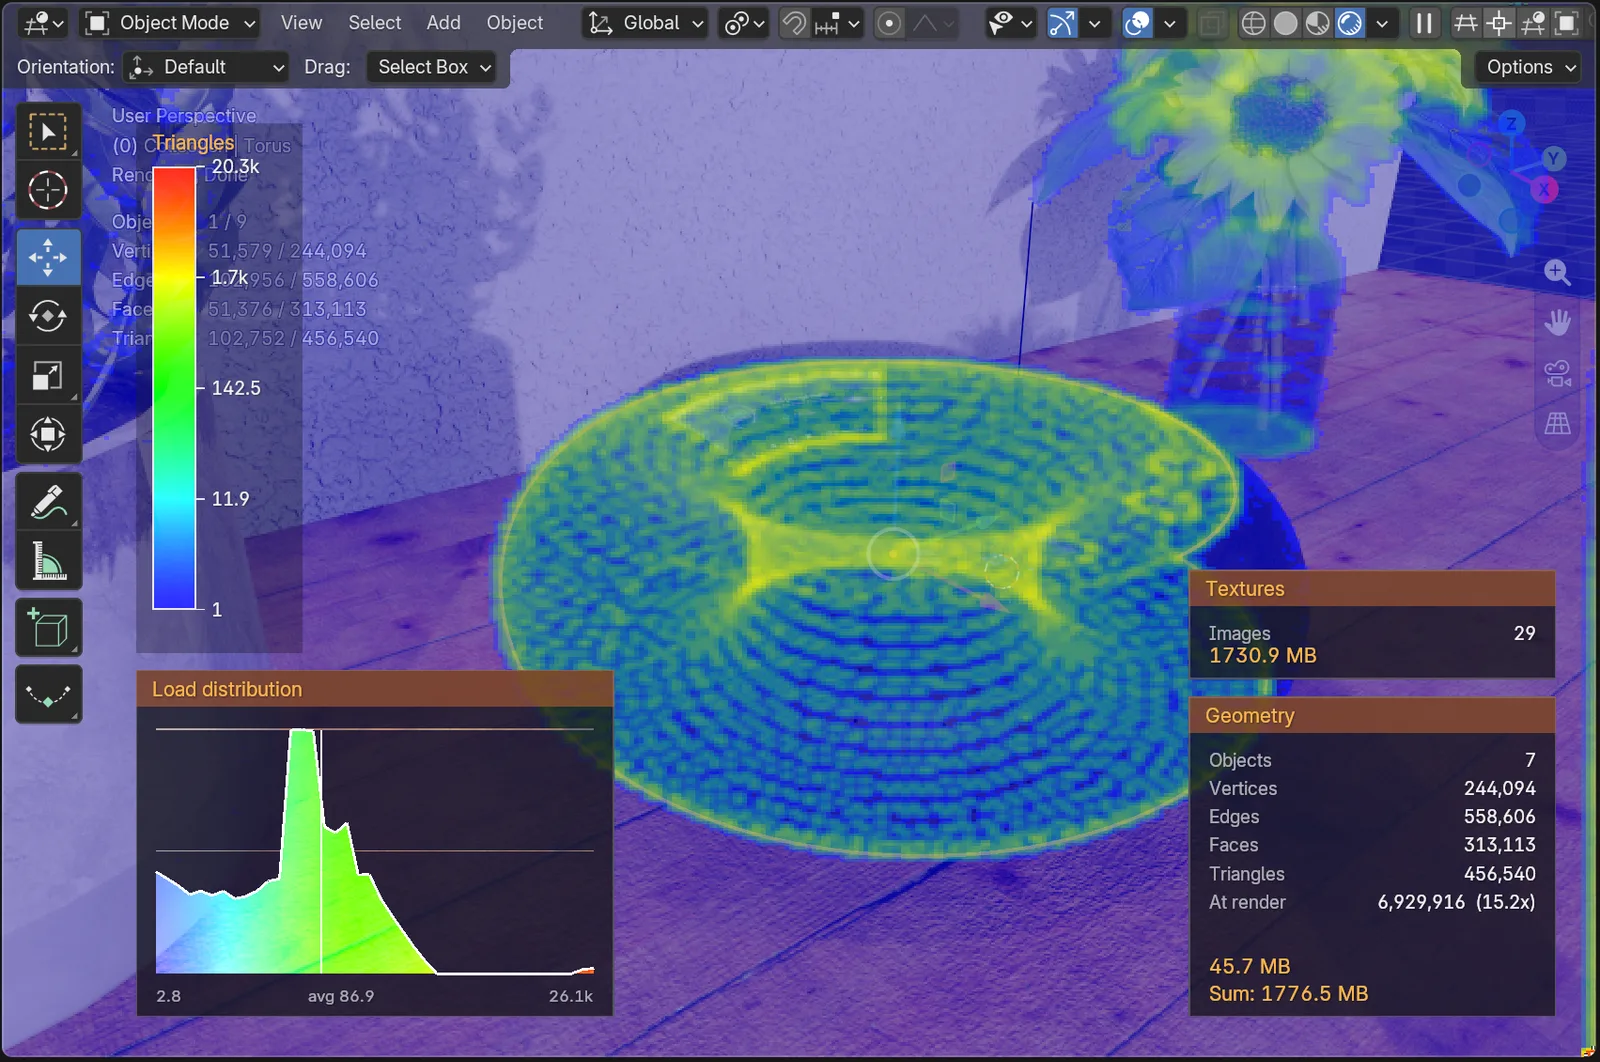
Two classic heatmap views color the scene by estimated render cost — from cool blue (light) to hot red (expensive) — based on each object's screen coverage, polygon and micro-polygon count, active modifiers, displacement strength, and array or instance repetition. The Grid Heatmap shows which tiles are the most expensive, so you can decide whether to split a render further. The High-Resolution Heatmap zooms into the detail grid and shows hotspots even within a single tile.
Persistent 3D Heatmap (since 1.42)
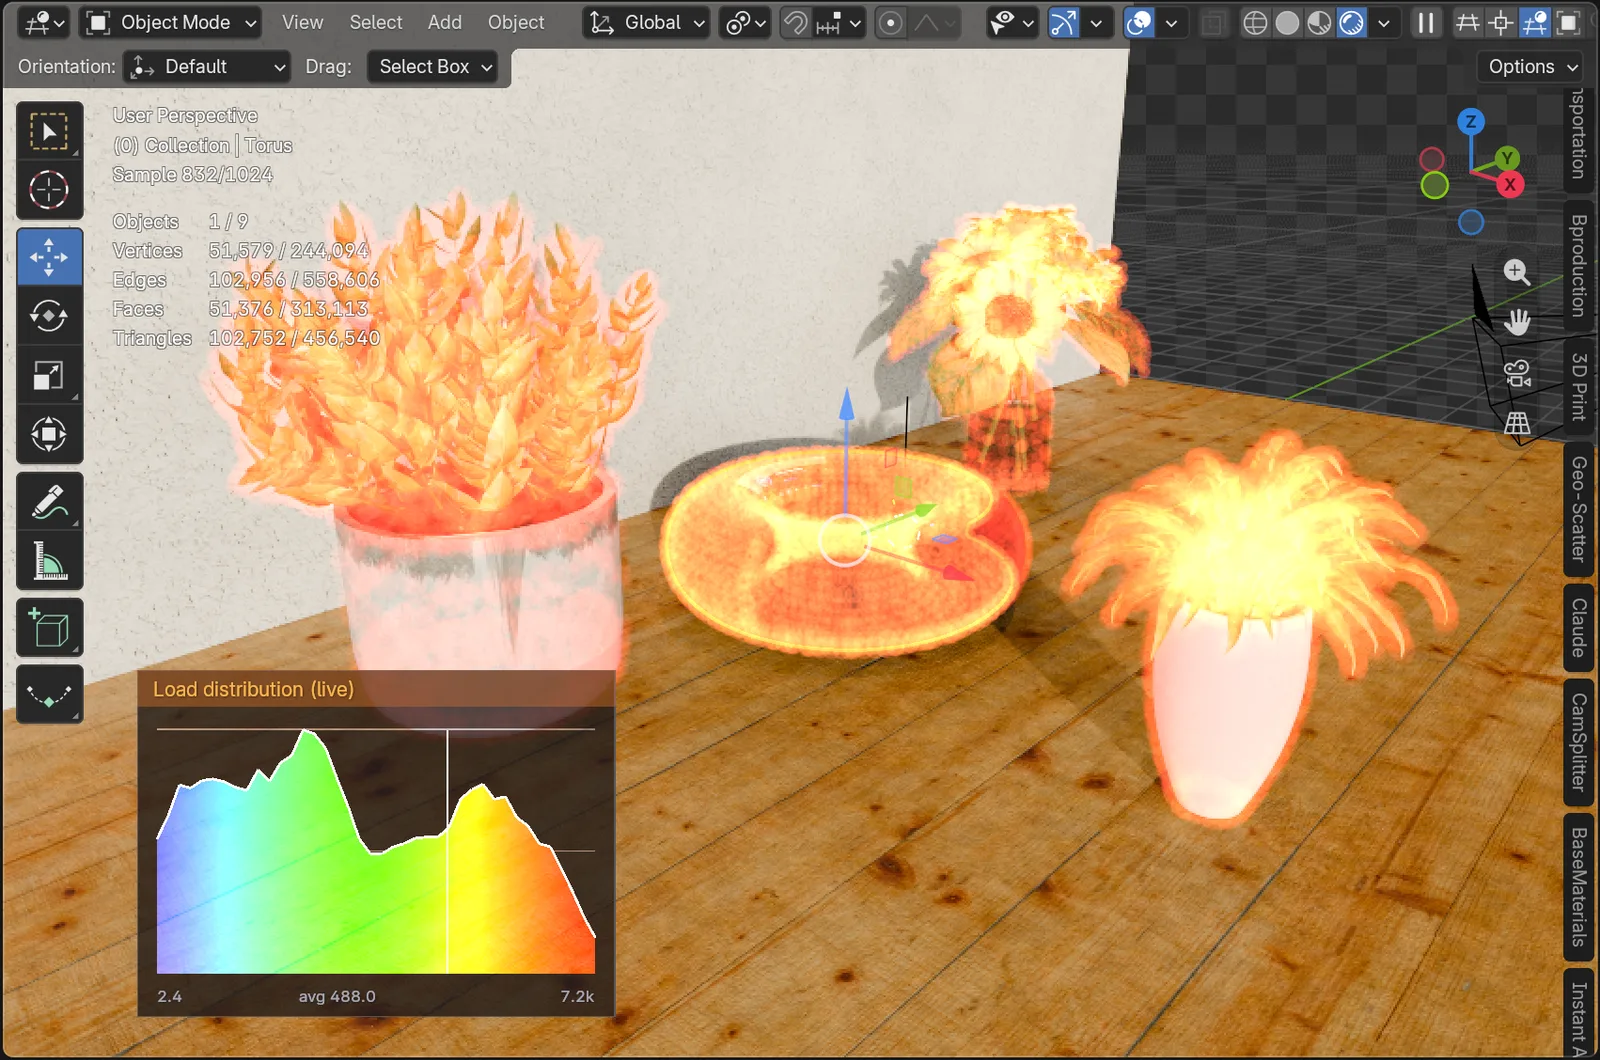
One click in the viewport header and your scene's render load appears as a glowing point cloud in 3D space. It stays put while you orbit and zoom, works in every shading mode (even Solid), and draws on top of everything like an X-ray film. Two looks: additive (denser = brighter glow) or absorption (denser = darker red). Halos have a real-world size in Blender units, so the cloud reads the same in every scene. While the 3D heatmap is on, a live load histogram follows your navigation in real time — orbit, pan and zoom, and narrow load spikes show up as distinct features of the curve.
Object Tracker HUD
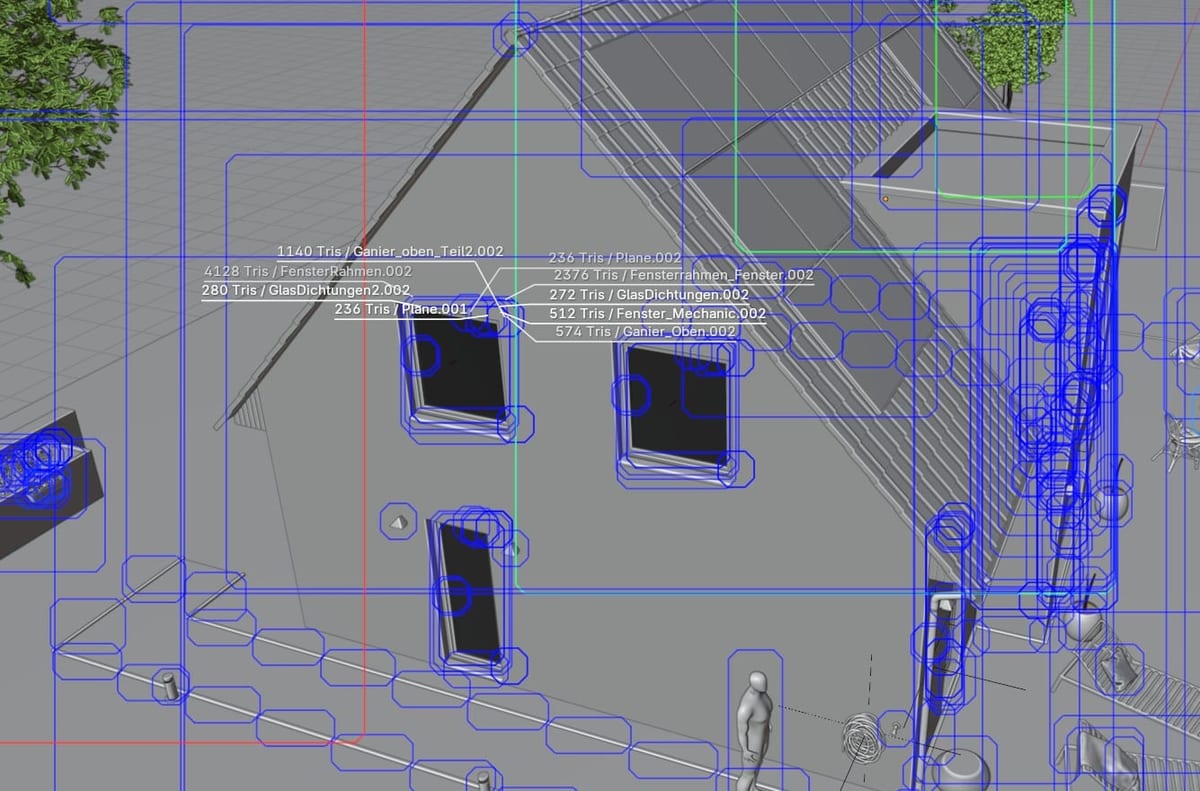
The Object Tracker HUD overlays every object in the 3D viewport with its polygon count and name — an instant way to spot which imported assets are the actual memory hogs in a large scene.
What's new in CamSplitter 2, version 2.2
Version 2.2 brings two things together: a new way of stitching the tiles (built for 2.1, which was never released on its own) and a reworked panel that always shows where your render stands and lets you stop it at any moment.
Control while rendering
- Esc stops the running tile immediately. Each tile now renders as a regular Blender render job, so Esc ends the current tile right away instead of after it. The interrupted tile stays open, every finished tile stays saved, and "Render N Missing" picks up from there. Single tiles can be stopped with Esc the same way.
- The interface is locked while a tile renders. CamSplitter switches on Blender's Lock Interface for each tile, so the scene can't change halfway through a tile. In the 2-second pause between tiles the interface is unlocked, as before.
- Tile states at a glance. Every tile in the panel grid shows whether it is done, unclear, failed or still open, with the reason right in the panel and a button to render it again.
- Re-render All. Renders every tile again after a confirmation, for example after you changed materials or lights.
- Click a tile, confirm, render. A click on a tile without a file asks first and shows its size, estimated load and status. Shift+Click renders right away.
- View a finished tile. A click on a tile that already has a file offers "View Tile" and "Render Again". "View Tile" shows the tile file in Blender's render window.
- Heaviest tiles. After a heatmap scan, up to three of the most expensive tiles get a glow dot, with a "Test heaviest" button for a quick test render.
- Live progress and a finish card. The rendering tile pulses in the grid, a small progress card sits in the corner of the viewport, and when everything is done the panel shows "Your image is ready" with a preview, resolution, time and buttons to open the image or its folder. An optional soft chime tells you when it's finished.
New stitching engine
- Stitching no longer touches the compositor. Tiles are combined by CamSplitter itself, in Python with OpenImageIO and OpenColorIO, both already part of Blender. Your scene's compositor, resolution and color management are never modified during stitching, and an empty compositor is no longer required. Tile placement stays pixel-identical to previous versions (verified on 18 grid/overlap combinations); colors are bit-identical to the old path for Standard, Filmic and Khronos PBR Neutral, and within one 8-bit step on fewer than 0.5 % of pixels for AgX. OpenEXR output is bit-identical.
- Gigapixel output streams straight to disk. Memory use no longer grows with the size of the final image: a 40,960 × 40,960 pixel PNG (1.68 gigapixels, 400 tiles, 1.5 GB file) was stitched in 3 minutes 21 seconds with a peak of about 470 MB above Blender's own baseline. Stitching 25 float EXR tiles into a 10,000 × 10,000 image took 0.84 GB of RAM and 3.3 s, compared with 10.3 GB and 13.5 s on the old compositor path (Blender 5.2).
- Your own compositor nodes are applied once, to the whole image. Effects that need the full frame (vignettes, glare, lens distortion, film grain) would otherwise run on every single tile. CamSplitter bypasses them while tiles render, then feeds the linear stitched image through a copy of your node tree once, at full resolution, with your output format and color management. Your original nodes are never modified.
- The compositor always runs on the CPU while CamSplitter composes. In Blender 5 the GPU compositor silently produces broken images above roughly 67 megapixels and can crash at 10,000 × 10,000. Your render device (Cycles/EEVEE) is not affected.
- Linear EXR master, on request. "Keep Linear EXR Master" additionally writes
<name>_linear.exr, the stitched image as 32-bit float linear RGBA before any view transform, for grading or re-encoding without rendering again. - Fill Missing where you need it. "Fill Missing Tiles" now sits directly on Recompose From Folder.
- Cleaner transparent edges. Semi-transparent edges against a transparent background (Film > Transparent) used to come out slightly too dark, because the old path premultiplied the pixels a second time. Fully opaque and fully transparent pixels were never affected.
- The previous engine stays available. Advanced > Stitch Engine can be switched back to "Compositor (legacy)". If a setting can't be handled by the new engine, CamSplitter tells you before the render starts and falls back automatically, but only when the compositor is empty; it never deletes your nodes.
Fixes
- Scene resolution is restored after every run, finished or cancelled, also with a render resolution below 100 %.
- No render window per tile. During a run CamSplitter sets Preferences > Interface > Render In to "Keep User Interface" and restores your setting afterwards.
Rendering, stopping and resuming
Tile states
The grid in the CamSplitter panel shows one button per tile. Its icon tells you the state, and the header counts them, for example "4 done · 1 unclear · 4 to go". The grid is drawn up to 12 × 12 tiles. For larger grids the panel only shows the tile count ("Too many tiles to preview"), and single tiles are rendered from Utilities > Single Tile.
- Done (green check): the tile file exists and matches the current settings.
- Unclear (yellow question mark): a file exists, but CamSplitter has doubts. The file is empty, its header can't be read, its pixel size doesn't match the current grid, it uses the old file name without the grid size, or it was rendered with different settings (resolution, overlap, pixel aspect, camera, camera position, focal length or ortho scale, shift, sensor).
- Failed (red exclamation mark): the last attempt reported an error and no newer file was written.
- Open (dashed ring): no file yet.
For failed and unclear tiles a small card below the grid names the
reason and offers "Retry Tile" or "Re-render". To know all this,
CamSplitter writes a small run log, camsplitter_run.json,
into the output folder. It records camera and render settings, not
materials or lights.
The render buttons
- Render N Tiles when nothing is done yet.
- Render N Missing when part of the grid is done: verified tiles are kept, open, unclear and failed tiles are rendered. This is also how you resume a stopped run.
- Render Again when every tile is done.
- Re-render All renders every tile again and replaces the existing tile files. It asks first ("Re-render All Tiles?"). Use it after changing materials or lights, because such changes don't make a tile unclear.
- Rebuild Final Image appears once a file exists for every tile and stitches the image again, for example after you re-rendered a single tile.
Single tiles and the heaviest tiles
Click a tile to open a small dialog with the tile's size, estimated load and status. For a tile without a file it reads "Render tile 2,3?", and "Render Tile" starts it. For a tile that already has a file (done, unclear, or failed with an older file) it is titled "Tile 2,3" and offers "View Tile" and "Render Again". "View Tile" opens the tile file in Blender's render window and always loads the current file from disk. "Render Again" renders the tile again. The "Retry Tile", "Re-render" and "Test heaviest" buttons open the same dialog. Shift+Click renders right away. During a run a click only selects the tile. After a heatmap scan while looking through the camera, up to three tiles with at least 1.5 times the average load get a glow dot, and the panel shows a line like "Heaviest: 2,3 (≈ 3.2x avg)" with a "Test heaviest" button. The load is an estimate from the triangle count of the heatmap, not a render time.
While it renders
The tile that is rendering pulses in the panel grid, queued tiles show a clock. A small card in the bottom right corner of the viewport shows the grid in color, the current tile (for example "Tile 2,2 · 5 / 9"), an estimate of the remaining time and "Esc to stop". The panel shows Blender's own progress bar for the current tile. Output Folder, Grid Size, Overlap, Offscreen Dicing and the Advanced and Utilities panels are locked until the run ends.
Stopping
- Esc stops immediately. Pressing Esc ends the running tile right away. The tile stays open, all finished tiles stay saved.
- Stop After This Tile. The red button in the panel stops before the next tile. While a tile renders, Blender's Lock Interface ignores clicks and hides the X of the progress bar, so the button is dimmed and the line below it reads "Esc stops immediately." It takes effect in the 2-second pause between tiles.
- The 2-second pause stays. Between two tiles CamSplitter waits two seconds. You can watch the camera move to the next tile, and it is the moment where "Stop After This Tile" works.
To resume, press "Render N Missing". Finished tiles are not rendered again. While a run is going, the panel reminds you: "Resume later: Render Missing."
When it's done
The output box turns into a finish card: "Your image is ready", a preview (for images up to 200 megapixels), resolution, number of tiles, time and file name, with "Open Image", "Show Folder" and "Dismiss". A soft chime can play when the image is ready; it is off by default and can be switched on under Preferences ("Soft Chime When Finished") or directly on the card.
Settings reference
- Stitch Engine (Advanced). "Python (no compositor)" (default) combines tiles without the compositor. "Compositor (legacy)" restores the 1.x behaviour. Switch to it if you rely on a feature listed under Known limits below.
- Apply User Compositor (Advanced, on by default). Runs your compositor node tree once on the finished stitched image. Turn it off to get the plain stitched image and apply your nodes yourself.
- Compositor Size Limit (Advanced, default 60 megapixels). Keeps Blender's in-memory compositor from running on gigapixel images; it needs roughly 1 GB of RAM per 10 megapixels for a typical glare and vignette chain. Above the limit, CamSplitter writes a linear EXR master and you apply your nodes to it by hand. If you do that at such sizes, first set Render Properties > Performance > Compositor > Device to CPU: in Blender 5 the GPU compositor silently produces broken images above roughly 67 megapixels. Raise the limit if you have the memory.
- Keep Linear EXR Master (Advanced). Writes
<name>_linear.exralongside your normal output: the stitched image before any view transform. - Fill Missing Tiles (Utilities, on Recompose From Folder). Fills tiles that are missing from the folder with placeholders instead of stopping with an error.
- Soft Chime When Finished (add-on preferences, off by default). Plays a short, quiet chime when the final image is ready.
Known limits
- Only Image and Alpha survive the compositor pass. Other render passes (Depth, Normal, Mist, Cryptomatte and the like) are reported but left unconnected in the applied node copy.
- JPEG and WebP go through a different encoder (OpenImageIO instead of Blender's own). Lossless formats (PNG, TIFF, TGA, BMP, lossless WebP, EXR) are unaffected; JPEG differs by up to 8/255 on about 3 % of pixels, inherent to lossy compression, not a stitching difference.
- Curve Mapping, white balance (Blender 4.3+), HDR display devices and a few output formats (JPEG 2000, DPX, Cineon, IRIS, AVIF, video containers) aren't handled by the Python engine. CamSplitter reports this and falls back to the compositor, but only when the compositor is empty.
- OpenEXR Multilayer is written as a single-layer EXR. The stitched image has only one layer anyway.
- The legacy compositor engine is no longer pixel-exact in Blender 5.2 at very large sizes. At 10,000 × 10,000 pixels about three quarters of the pixels differ by up to 0.003, with alpha 0.99927 along tile seams (Blender 5.1.2 is still exact). The Python engine is exact in both versions; this only affects the fallback path.
- Materials and lights are not part of the tile check. After changing them, use Re-render All. If you cancel Re-render All halfway, the folder holds new and old tiles side by side; run it again for a consistent image.
- Stopping mid-tile needs the keyboard. While a tile renders the interface is locked, so Esc is the way to stop right away.
- Render In after a crash. If Blender crashes during a run and saves its preferences automatically, Render In may stay on "Keep User Interface". Set it back under Preferences > Interface > Temporary Editors if F12 no longer opens a render window.
- Faint seams between tiles can come from denoising. The denoiser works on each tile on its own and can't see across the tile border, so neighbouring tiles may not match exactly. If seams show, switch denoising off for the tile render.
- Path Guiding can cause slight brightness differences between tiles. Cycles offers Path Guiding only when rendering on the CPU. It changes how the light is rendered, so the brightness can differ minimally from tile to tile; switch Path Guiding off or render on the GPU.
Earlier: version 1.42
- Persistent 3D heatmap in any shading mode, with an additive or absorption look and a real-world halo size, plus a live load histogram.
- Heatmaps follow your view from any viewport angle; through the camera the cells match the rendered tiles.
- Pixel-exact tiles at every resolution and physically correct depth of field during tile rendering.
Compatibility
CamSplitter 2 runs in Blender 4.3 through 5.2, with both Cycles and Eevee, and installs as a Blender Extension (Edit > Preferences > Get Extensions > Install from Disk). Licensed under the GPL (GPL-3.0-or-later), like every Blender add-on.
Built by CG-Mechanics
CamSplitter grew out of our own need: at CG-Mechanics, we regularly render technical visualizations for building facades, exhibition posters and large-format prints — resolutions that push a standard Blender render past its limits. We use CamSplitter internally on nearly every large project; selling it lets other studios and freelancers hit the same wall without having to build the tool themselves. See what we build with it in our technical visualization work.
FAQ
What is CamSplitter 2?
CamSplitter 2 is a Blender add-on that renders ultra-high-resolution images — 8K, 16K and beyond — on standard hardware. It splits the camera view into tiles, renders them one by one, and composites the result back into a single image automatically. It also ships render-load analysis tools (grid and high-resolution heatmaps, a persistent 3D heatmap, an Object Tracker HUD) that show where a render is expensive before you commit to it.
What's new in version 2.2?
Esc now stops the running tile immediately while all finished tiles stay saved. The panel grid shows every tile as done, unclear, failed or open, Re-render All renders everything again after a confirmation, and a finish card shows the result. Stitching runs in Python without the compositor, streams gigapixel images to disk, and applies your own compositor nodes once to the whole image.
Which Blender versions and render engines does it support?
Blender 4.3 through 5.2, with both Cycles and Eevee. CamSplitter installs as a Blender Extension (Edit > Preferences > Get Extensions > Install from Disk).
How much does it cost and where do I get it?
CamSplitter 2 costs $20 and is sold exclusively on Superhive (formerly Blender Market) — see the button above or below.